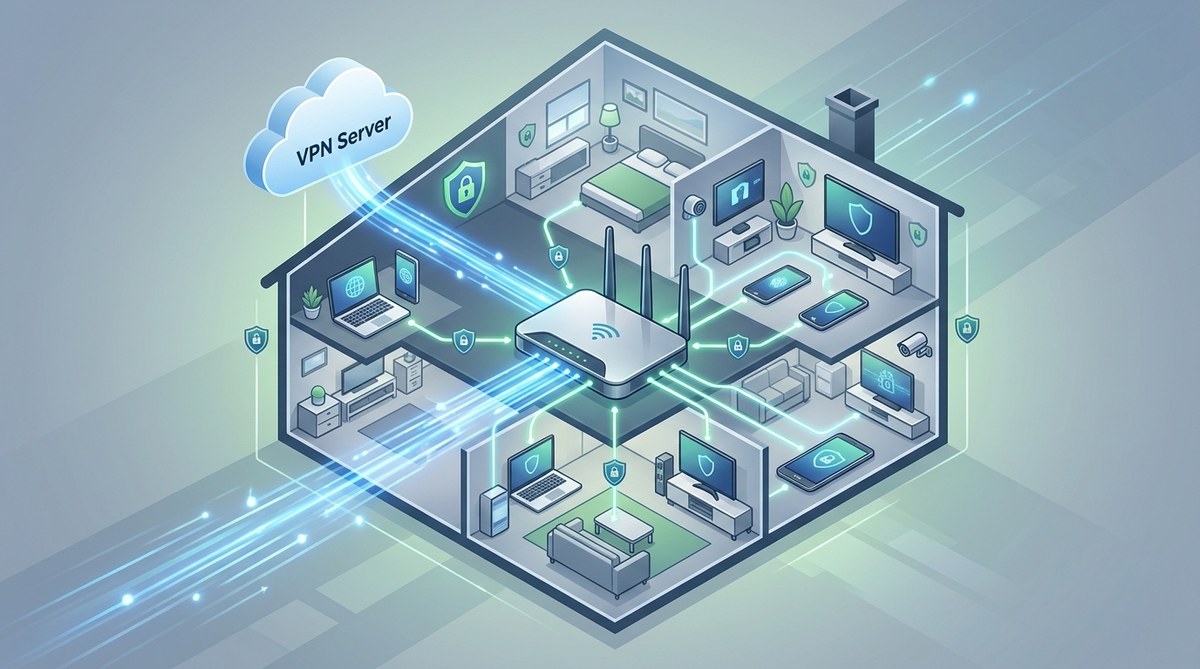
You have a smart TV, a gaming console, a few phones, tablets, laptops, and maybe a smart thermostat or two. Each one connects to your home Wi-Fi, and each one sends data about you out into the world. You could install a VPN app on every single device, but that gets old fast. Some gadgets won’t even let you install a VPN at all. That is why learning how to set up a VPN on a router is the single most effective way to lock down your entire home network at once. Once it is configured, everything behind your router gets the same encryption and privacy protection. No app installs. No forgetting to turn it on. Just blanket security for every device in your house.
Setting up a VPN on your router protects every device on your home network without installing individual apps. This guide walks you through checking router compatibility, choosing the right protocol, and completing the setup step by step. You will learn common pitfalls to avoid, how to fix connection issues, and when to use split tunneling for better speed. By the end, you will have whole-home privacy that works automatically.
Why You Should Put a VPN on Your Home Router
Think about all the devices in your home that talk to the internet. Your laptop and phone are obvious. But what about your Nintendo Switch, your Roku, your smart speaker, or the baby monitor? Most of these devices have no built-in option for a VPN. They just send your traffic over your ISP’s network without any encryption.
When you set up a VPN on your router, every bit of data leaving your house gets encrypted before it reaches your internet provider. Your ISP cannot see which websites you visit, what you stream, or who you message. They only see that you are connected to a VPN server somewhere else. This matters more now than ever. In 2026, ISPs have more leeway than before to collect and sell your browsing habits. A router-level VPN stops that cold.
There is another benefit that surprises people. You can use it to access content from different regions on any device. If you want to watch a show that is only available in the UK, you can connect your router to a UK server and every screen in your house will see that content as if you were sitting in London. No need to configure each device separately.
What You Will Need Before You Start
Before you begin, gather a few things so you are not hunting around mid-setup.
- A compatible router. Not every router supports VPN connections. You need one that has a built-in VPN client feature. Many modern routers from brands like Asus, TP-Link, Linksys, and Netgear include this. If your router is more than five years old, it might not.
- A VPN service subscription. You need a provider that gives you configuration files or manual setup details. Most major VPNs offer OpenVPN or WireGuard config files.
- The login credentials for your router’s admin panel. This is usually an IP address like 192.168.1.1 or 192.168.0.1 along with a username and password. If you never changed them, they are often “admin” and “password” printed on a sticker.
- A computer or phone connected to your network. You will use it to access the router settings.
If your current router does not support VPNs, you have options. You can flash custom firmware like DD-WRT or Merlin onto a compatible router. Or you can buy a router that comes pre-configured for VPN use. Either way, the steps below assume you have a router that can handle a VPN client.
Step-by-Step: How to Set Up a VPN on a Router
The exact menu names vary by router brand, but the overall process is the same across most models. Follow these steps. If you get stuck, your VPN provider’s support site usually has specific guides for popular router brands.
Step 1: Log Into Your Router’s Admin Panel
Open a web browser on a device that is connected to your home network. Type your router’s IP address into the address bar. Common addresses are 192.168.1.1, 192.168.0.1, or 10.0.0.1. Hit Enter and you will see a login page. Enter your admin username and password. If you do not know these, check the sticker on your router or look up the default credentials online.
Step 2: Find the VPN Client Section
Once you are in the admin panel, look for a section labeled “VPN,” “VPN Client,” “VPN Settings,” or something similar. On Asus routers it is under “VPN” in the left menu. On TP-Link routers look for “Advanced” then “VPN Client.” On Linksys routers it is often under “Connectivity” then “VPN.” If you cannot find it, use the search function inside the admin panel or check your router’s manual.
Step 3: Choose Your VPN Protocol
Most routers support OpenVPN, L2TP/IPsec, or PPTP. Avoid PPTP. It is outdated and not secure. OpenVPN is the most widely supported and offers strong encryption. WireGuard is newer and faster but not every router supports it yet. If your router and VPN provider both support WireGuard, use that. It is simpler and usually faster.
Step 4: Upload or Paste Your VPN Configuration
Your VPN provider will give you a configuration file, usually with a .ovpn extension for OpenVPN or a .conf file for WireGuard. In the router’s VPN client page, you will see an option to upload this file. Some routers let you copy and paste the contents instead. Do that. Then enter your VPN username and password if your provider requires them.
Step 5: Apply the Settings and Connect
Save the settings and hit the connect button. The router will try to establish a connection to the VPN server. This can take 10 to 30 seconds. Once connected, the status should change to “Connected” or show the server’s IP address. You can verify it by visiting a site like whatismyip.com from any device on your network. If the IP shown matches your VPN server’s location, you are all set.
Step 6: Test and Confirm
Browse the web normally for a few minutes. Check that streaming services work, that pages load, and that your connection feels stable. If everything looks good, then your whole home is now protected. All traffic from every device goes through the VPN tunnel. Your ISP sees only a single encrypted connection to your VPN provider.
Router Compatibility and Firmware Table
Not all routers are created equal when it comes to VPN support. Here is a quick reference to help you understand what works best.
| Router Type | VPN Support | Ease of Setup | Best For |
|---|---|---|---|
| Stock firmware (Asus, TP-Link, Netgear, Linksys) | Often includes VPN client, but varies by model | Moderate | Users with a recent router that supports OpenVPN or WireGuard |
| DD-WRT firmware | Full VPN client support, highly customizable | Higher effort | Users willing to flash custom firmware for more control |
| Merlin firmware (Asus routers only) | Excellent VPN support, user friendly | Medium | Asus router owners who want better performance and features |
| Pre-flashed VPN router (e.g., FlashRouters, GL.iNet) | Comes ready with VPN client pre-installed | Easy | Users who want a plug-and-play solution without tinkering |
| Old ISP-provided router | Rarely supports VPN client | Difficult or impossible | Upgrade recommended |
If your router falls into the last category, consider replacing it. A modern router with VPN support costs between $60 and $150 and pays for itself in privacy protection.
Common Mistakes When Setting Up a Router VPN
People often trip over the same few issues. Avoid these and your setup will go much smoother.
- Forgetting to update your router’s firmware first. Old firmware can lack VPN features or have bugs that break the connection.
- Using the wrong protocol. Your VPN provider may offer several protocols. Pick the one your router supports. OpenVPN over UDP is usually the safest bet.
- Not enabling the VPN client on the correct interface. Some routers have separate settings for WAN and LAN. Make sure the VPN is applied to the internet-facing connection.
- Skipping the DNS settings. If your router’s DNS is still pointing to your ISP, your DNS queries might leak. Set your router to use the VPN provider’s DNS servers or a trusted third party like Cloudflare.
- Assuming all devices are covered. If you have a separate access point or mesh system, the VPN only applies to devices connected to the main router. Check your network topology.
Expert tip: After you finish the setup, run a leak test from any device. Use a site like ipleak.net or dnsleaktest.com. If you see your real IP address or your ISP’s DNS servers, something is misconfigured. Go back and check the DNS and kill switch settings in your router’s VPN menu.
When to Use Split Tunneling
Split tunneling lets you choose which traffic goes through the VPN and which goes directly to the internet. You might want this for a few reasons.
- Streaming services like Netflix or Hulu sometimes block VPN traffic. You can route those devices outside the VPN while keeping everything else protected.
- Online gaming often suffers from higher latency over a VPN. If you play competitive games, you might want your gaming console or PC to bypass the VPN.
- Local network devices like printers or smart home hubs need direct access to each other. Split tunneling prevents the VPN from interfering with local traffic.
Most router VPN clients have a split tunneling option. You can usually select by IP address, by device MAC address, or by destination domain. Use it sparingly. Every device you exclude is sending unprotected data to your ISP.
Troubleshooting a Router VPN Connection
Sometimes the connection does not work on the first try. Here are the most common issues and how to fix them.
-
VPN connects but no internet access. This usually means the router’s DNS settings are wrong. Go back into the VPN client settings and manually enter the DNS servers provided by your VPN service. If that does not work, try changing the protocol from UDP to TCP in the OpenVPN settings.
-
Connection drops randomly. Your router might not have enough processing power to handle encryption. Lower the encryption level in your VPN configuration or upgrade to a faster router. Also check that your router’s firmware is up to date. For more on this, see our guide on why your VPN keeps disconnecting and how to fix it permanently.
-
Certain sites or apps still show your real location. This is often a WebRTC leak. Disable WebRTC in your browser settings or use an extension that blocks it. You can also check our article on how to test your VPN for DNS, IP, and WebRTC leaks in 5 minutes.
-
The VPN client option is grayed out. Your router model may not support VPN in its current firmware. Check for a firmware update first. If that does not help, consider flashing DD-WRT or buying a VPN-compatible router.
-
Slow speeds after connecting. Encryption takes processing power. If your router is older, it might struggle with speeds above 50 Mbps. Use a lighter protocol like WireGuard if your router and provider support it. You can also learn more about why your VPN might be slower than a proxy and when it matters.
Is a Router VPN Right for Your Home?
Router-level VPNs are not for everyone. If you live alone and only use a laptop and phone, installing a VPN app on each device might be simpler. But if you have a household with multiple people, smart devices, streaming boxes, and guests, a router VPN is the most efficient way to protect everyone.
There is one trade-off to keep in mind. When the VPN is on your router, you cannot easily switch between server locations. You have to log back into the admin panel to change servers. Some routers let you set up multiple VPN profiles and switch with a click, but it is still less flexible than a per-device app.
If you need different locations for different devices, you can combine a router VPN with per-device apps. For example, your router could connect to a US server for the whole house, and you could install a VPN app on your laptop to connect to a UK server when you want British Netflix. Just make sure you understand the privacy implications. Our comparison of SOCKS5 proxy vs VPN: which one actually protects your privacy can help you decide which tool fits each situation.
Keeping Your Router VPN Running Smoothly
Once the setup is done, a little maintenance goes a long way. Reboot your router every few weeks to clear out memory leaks. Check for firmware updates monthly. VPN providers sometimes update their server addresses or configuration files, so if your connection stops working, visit your provider’s setup page and download a fresh config file.
Also run a leak test every time you change VPN servers or update your router’s firmware. It takes two minutes and can save you from thinking you are protected when you are not.
If you want to understand what happens behind the scenes, our article on what your ISP can see when you browse and how to limit it explains exactly what changes when you add a router VPN to the mix.
Your Whole Home Is Now Protected
You did the work. Every device in your house is now sending its traffic through an encrypted tunnel. Your ISP cannot see your browsing history. Your smart TV cannot be tracked by ad networks. Your kid’s tablet is protected even when they forget to turn on a VPN app. It feels good, right?
Setting up a VPN on your router is one of those projects that takes an hour once and then delivers privacy every single day after that. If you run into any snags, go back through the steps above. Most issues come down to a wrong DNS entry or an outdated config file. And remember, you can always reach out to your VPN provider’s support team for router-specific help.
Now go browse with confidence. Your home network has a new layer of armor.